Creating Character Skins
Here we will outline the methods you can use to make new Jumpy character skins with animations. Currently we are keeping character skins within the same basic silhouette as the ones already in the game, so if you are interested in making a new skin, the easiest way is to open an existing Jumpy skin, copy it, and use it as a reference for your new skin.
Copying a Skin
To open an existing skin, navigate in your file browser to where you have Jumpy saved on your computer. Inside the game folder you will find an assets folder that you will want to open. From there open, player→skins, and you will find the list of skins in the Jumpy game.
For this example, we are going to use Pescy as a reference for your new skin. I suggest using Pescy because some of the other skins have small nuances that make them more complicated. Inside of Pescy's folder you will find three images, pescy-body, pescy-face, and pescy-fins. Along with these images will be four files ending in .yaml. Later in this guide we will cover how to edit the yaml file to get your skin's animations working, but for now we are going to focus on making the proper images for your animations.
Before you start making your own skin, you will want to create a spot in the Jumpy files to put your new skin. Let's say you are creating a puffer fish skin that we will call Puffy. Inside the jumpy skins folder in your file browser, create a new folder and name it puffy. Because we want to use Pescy as a reference, go ahead and copy all three images in the pescy folder as well as all the .yaml files, and put them into your puffy folder. Be sure to rename all of the copied files appropriately, for example puffy-body and puffy.player.yaml, etc.
We are going to be using Libre Sprite to create a new skin in this example, but any other image editor can be used, though some of the steps will vary depending on your chosen tool. If you wish to use Libre Sprite yourself, it can be downloaded for free.
Editing the Sprites
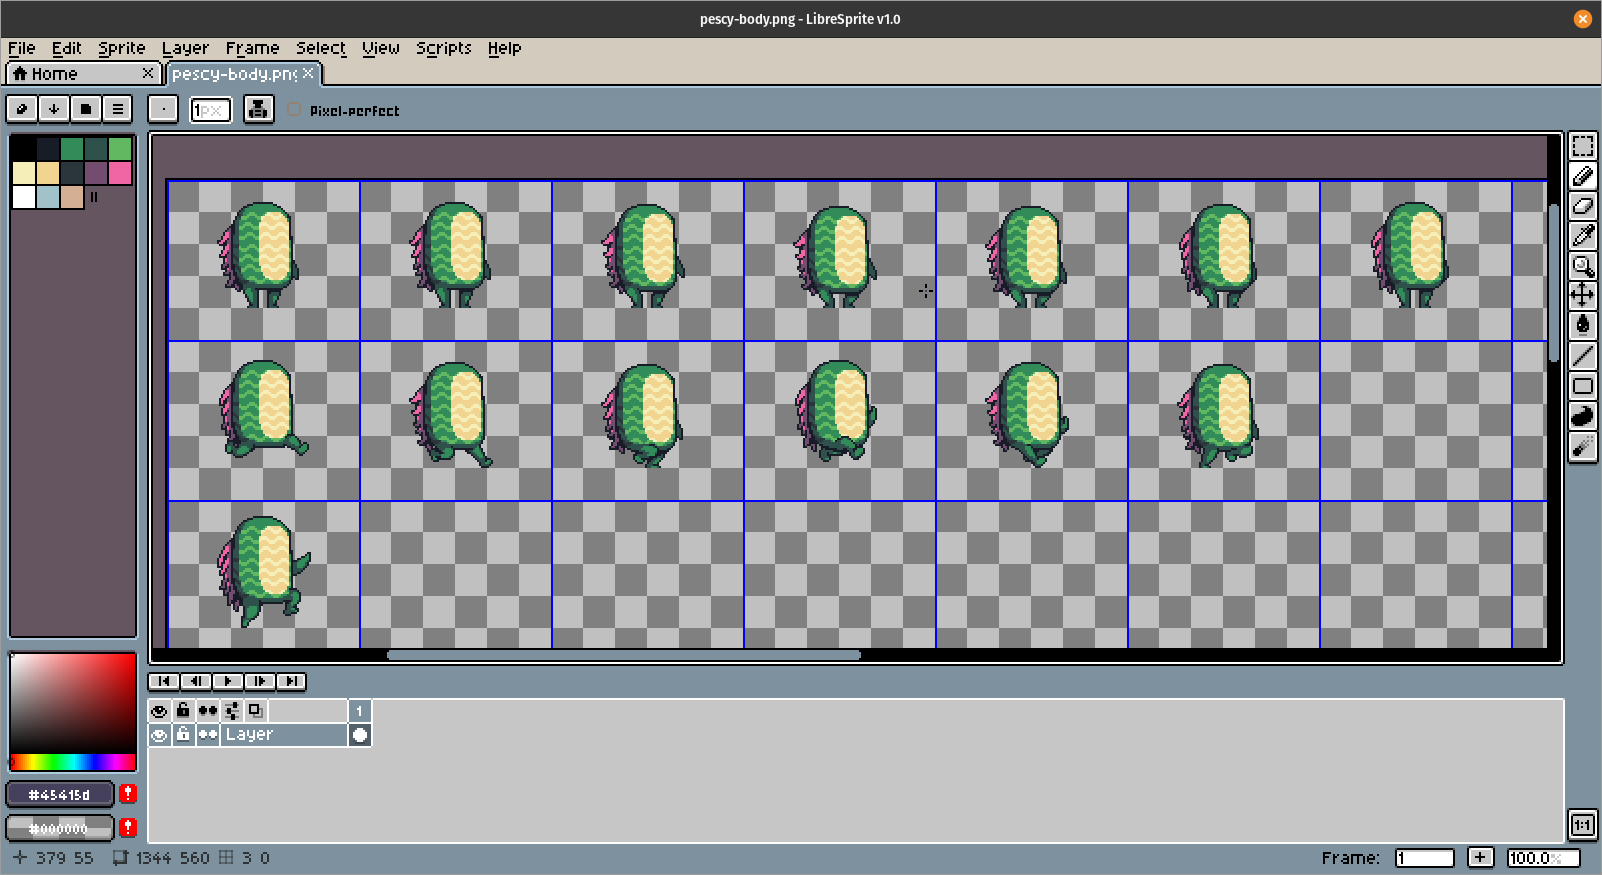
Now that we have all of the files from pescy copied and renamed correctly, go ahead and open puffy-body, puffy-face, and puffy-fins in Libre Sprite. You will be able to see that each image has multiple frames arranged in columns and rows. Each horizontal row has a series of sprites representing the frames necessary for one of the character's animations. In the pescy-body image, the first row is all the frames in his idle standing animation. Notice that puffy-body is missing both a face and fins because these are each represented in their respective images. These different parts of the character are separated so that they can be animated independent of each other in the game. Despite being separate images though, each row represented in puffy-body and puffy-fins have a direct relationship to the same associated animation. That simply means that because the first row of frames in puffy-body is the standing animation, then the first row of frames in puffy-fins is also for the standing animation. This arrangement helps us keep track of what animation each row is used for across different images.
If you view puffy-faces, you will notice that it only has one row of frames. The reason for this is that faces are not tied to any particular animation also involving the body and fins. Facial animations can happen during any stage of other animations such as walking and jumping.
Staying Within the Grid
Every sprite in an image resides in a frame of the same size, but different images have different frame sizes.
- Frame size for
body96x80 pixels - Frame size for
fins24x34 pixels - Frame size for
face46x32 pixels
These frame boundaries are not enforced by the editor automatically, so if your not careful you can end up with sprites running from one frame onto the other, which obviously is no good. To avoid this mistake you can use the grid feature.
To do this, use your Menu Bar to select View→Grid→Grid Settings. Set the height and width to the frame size for the image you are editing, for example puffy-body would be 96x80. Now a grid will be displayed that allows you to easily see the frame boundaries. Always leave an empty one pixel buffer around your sprites in each frame or that sprite will bleed onto other frames when played in the game.
Editing on a Layer
So now we can see where each frame is, but our skin is currently a copy of Pescy. To start creating your own skin, the best technique is to create a new layer, by clicking Layer→New Layer in the Menu Bar. Name the layer that has all of Pescy's sprites Pescy, and your new empty layer Puffy. Make sure that your Puffy layer is above the Pescy layer, and now you can start drawing on top of the Pescy sprites in your Puffy layer without messing up the Pescy layer that you are using as a reference.
When you are finished editing your image, if you try to save it, you will be given a warning saying that a .png image doesn't support layers. Instead, in the Menu Bar, click File→Save As and save your image as an .ase file. This will save your layers for future editing. This file can be safely saved in your puffy folder with the rest of the images.
When you have finished your new sprites, you can Save As and select png as the file type. Your final image will always have to be a .png to work in the game. You will be given the same error message about layers as before, but you will want to Save As anyway. Now it will ask you if you want to overwrite puffy-body.png because this image already exists. This is the image we started with, which currently has sprites copied from Pescy on it. We want to replace that image with our new one with Puffy sprites on it, so select Yes. One last step is necessary before your image will save properly. Just below the Menu Bar you will see that the file name now displays as a .png, but we still have two layers in our image and we know that a .png does not support layers. Because we no longer need the Pescy layer, delete it and you will be left with the single Puffy layer with your new sprites. Save the file again and your sprite will now be safely saved in a proper format.
If you decide that you want to change anything later, you still have your .ase file that has the Pescy reference layer in it, and you can make any changes you like to this file. Just remember to save it over the .png so that your changes will be applied to the game.
Updating the YAML Files
Your skin is now complete, but in order to use it in the game, we must configure the .yaml files in your puffy folder. Because we have used Pescy as a reference for our new skin, the configuration of the .yaml files will be simple. Later on we will cover more details on how to control the .yaml files, which will allow you to understand how to make more advanced and new animations for your skins. But for now, the process is merely a matter of replacing names. Open each .yaml file and find any occurrences of the name Pescy and merely rename them Puffy, using the same capitalization used in the original name. Be sure to save your changes before moving on to the next file.
After you have finished renaming everything in the .yaml files that accompany your skin, there is one last file you need to change. Navigate to the jumpy → assets folder and open the default.core.yaml file inside. This file has a players: heading with a list of references to all the player skin's .yaml files that are available to the game. In order to have your new skin show up in the game, you must add a reference to your new skin's .yaml file here copying the format used for the rest of the list. In this case it would be: - player/skins/puffy/puffy.player.yaml Now just save your changes and you are good to go!
If you have finished your new sprites for all of the original frames, then congratulations, you should now have a new skin complete with animations!
Editing the YAML Files
If you find yourself wanting to make a more unique skin for Jumpy that doesn’t closely follow an existing pattern, you may have to modify the .yaml files to make your skin the way you want. Here we will get into what the .yaml files do and how to change them in order to make a more unique skin that will still function properly.
The atlas.yaml Files
First we will cover the atlas.yaml files using Pescy as our example skin. Navigate through the Jumpy files to assets→player→skins→pescy and you will be able to see a atlas.yaml file for each of the skin layers that make up a character: body, face, and fin. Go ahead and open up pescy-body.atlas.yaml and take a look at what is inside. The .atlas files are pretty simple, they consist of labels describing the following:
image:This is the tile set image that includes all the frames for the body animations.tile_size:This is the size of each frame, or tile, in your tile set image. Each tile contains one of your animation frames, or is just an empty tile.columns:This is the number of vertical columns of tiles in your tile set image.rows:This is the number of horizontal rows of tiles in your tile set image.
Basically this file tells the game what image to use for the body tiles, and how the tiles are laid out, so that it can correctly retrieve each of the frames that make up the character animations. It is important to realize that when setting the number of columns and rows, you will have to include all the empty tiles, not just the tiles that have animation frames in them. Later we will go through an example including editing the .atlas files so you can understand the process of editing one better.
The player.yaml File
Now let’s open up the pescy.player.yaml file. This file is much larger, but is still fairly straight forward. The first label in this file is name: which is merely the display name for the skin in the game and it is likewise appropriately capitalized. There are also many other labels that include:
sounds:stats:body_size:gravity:
These four labels are not important to making or editing skins however, and should be left alone. Just below gravity: though, we find layers: with labels underneath for each of the three layers that make up a skin, body:, fin:, and face: which you can see if you scroll down through the file. Each layer has an atlas: label followed by the name of the atlas.yaml that is used for that layer. The animations: label should be left alone.
Just below the animations: label is a label for what animation is described beneath, the first of which is the body: idle: animation. This is the animation that plays when a character is standing in place doing nothing. Below the frames: label is a series of other labels and numbers that define what the idle animation is.
Defining the Body Animation
The body animation definition while somewhat lengthy, is not very complicated. Every frame for an animation is defined by two specifications.
Index
The first specification is the idx: label which simply stands for index. The index tells the game which frame/tile to retrieve. Tiles are numbered in reading order, starting at zero, and include any empty tiles. If you want, you can open up the pescy-body.png and set up the grid as described in the Staying Within the Grid section above, and you can easily count to the frames in the idle animation as described in this file and see what those frames look like.
Offset
The second specification is offset:. The offset: label controls the movement of the face: and fin: so that they move with Pescy's body:, such as when his body bobs during his idle or walking animations. If you didn't set the offset:, the face: and fin: layers would stay in place while the body moves beneath them.
Offset is controlled as follows:
- First/Left Number = Horizontal Offset: Positive offset moves the frame right, and negative moves the frame left.
- Second/Right Number = Vertical Offset: Positive offset moves the frame up and negative moves the frame down.
Putting It Together
By setting a sequence of frames in the index, then setting the appropriate offsets for those frames, we successfully create the fourteen frame idle animation. The final consideration for the animation is the fps: and repeat: labels beneath the frame specifications.
fps:This stands for Frames Per Second and will set the speed that the animation plays.repeat:This is a true or false field that will make the animation repeating or non-repeating. You probably will not have a reason to change this so it can be left alone.
And with all those labels set correctly, the entire idle animation is complete!
Animation Speed Inheritance
The other animations that are also set for the body are:
fall:rise:walk:crouch:slide:death_spine:death_belly:
These are all the animations needed for a complete skin and they are made the same way as the idle animation. There is a difference in the way that the animation speed or fps: is set though. The idle animation speed is set as fps: &fps 9. The &fps is a label that allows other animations to copy it's number value, which is 9. You can see that all the other animations have their animation speed set as fps: *fps. The *fps label tells the other animations to refer to the idle &fps value of 9. This arrangement means that you can set the animation speed on the idle animation, and all the other animations will automatically have the same speed. If you need to though, you still have the option to set the animation speed of each animation separately.
Fin and Face Animations
The fin: and face: layers, as mentioned before, have an atlas: label just like the Body layer, and these merely reference their respective atlas.yaml files.
Universal Offset
The next label is offest:, but you can see that it is above the animations: label, and none of the frames have an offset. For the face: and fin: layers this is a universal offset that applies to all frames and is only used to set the default position for the face and fins. Remember that the face and fins are moved by the offset: label for the body, so face and fins do not need an offset for each animation frame.
There is no good way to know exactly what the offset will need to be to position your face and fins properly, so you will have to take a look at it in the game and tweak it based on how it looks there. With a little bit of trial and error you will be set.
The emote_alarm: is the last animation for the face. In case it isn't evident, this is the "startled" animation that plays when the fish sees he is about to be blown up by a grenade for example.
Let's Go Through An Example
Just in case you have read through all the above and are still a little fuzzy on how the .yaml files work, we are going to go through an example to help clarify the process of editing these files.
We are going to copy Pescy and make a new skin that has a different face, and call it Punky. Before we get into the .yaml changes, follow the steps outlined in the Copying a Skin and Updating the YAML Files sections above. If you have all of Pescy's files copied and appropriately renamed, then you are ready for the next step.
To keep this simple we are going to use art that is already in the game and swap out Punky's current face with Fishy's face. What we are going to do is take the fishy-face.png from Fishy's skin folder and copy it to your Punky skin folder. We are going to keep punky-face.png around even though we are replacing it and rename it oldPunky-face.png for future reference. Now rename fishy-face.png to punky-face.png.
Now just for giggles, let's run Jumpy and see what it did to our characters face. What is going on?! Our skin clearly is not functioning correctly. The reason is that Fishy's face has extra frames in it's animation, but we did not change the punky-face.atlas.yaml to reflect this. So let's take a look at oldPunky-Face.png and the current punky-face.png side by side so we can see what is different. Open them both in Libre Sprite and when we compare we can see that the old face has 9 frames, with the included empty frame, while our new face has a total of 11.
Setting the Frame Layout
In order for our new face to display properly, we must edit the punky-face.atlas.yaml to reflect the fact that we now have 11 frames instead of 9. All you have to do is open the punky-face.atlas.yaml and set the columns: label to 11, and be sure to save before closing the file. Now let's run Jumpy again and see the result. Much better!
Setting the Universal Offset
Our face is now displaying properly, but maybe we don't quite like where it is positioned on the body, so let's move it. To do this we edit the universal offset which is set in the punky.player.yaml. In the file it is merely called offset: but specifically it must be the offset label under the face: label, which sets the universal offset for the face. Let's move the face 5 pixels to the right by adding 5 to the first number in the specification for a sum of 11. Then let's move the face 3 pixels down by subtracting 3 from the second number, which is 18, for a difference of 15.
Now run Jumpy again and take a look at how your changes came out. Now it looks even better, but you might notice that the blink animation doesn't quite look like Fishy’s. This is because we haven't set the .yaml to use the extra frames in Fishy's face animation.
Setting Animation Frames
We are now going to go back to the punky.player.yaml and take a look at the numbers under the frames: label for the face:. As we learned earlier, each number in the frame specification represents a frame in our Face tileset in reading order starting at 0. Go ahead and change all the frame specifications to 0 so we can start with a clean sheet. Now let’s open punky-face.png so we can tell what number to set each frame to. We are going to start the blinking animation at the 10th frame of our .yaml using the 4th frame of our tileset, remembering that tileset frames start at 0. Now set the 11th .yaml frame to the 5th tileset frame. Set the 12th .yaml frame to the 6th tileset frame. And finally set the 13th .yaml frame to the 7th tileset frame. Save your changes and go start up the game to see how it turned out. It should now look just like Fishy’s blinking animation!
By using these same techniques you can make your own unique face, fin, and body animations for Jumpy.